Friday, February 22, 2013

Happy Hello Card

Beverly Sizemore Hampton Art January Project Three Hello Card_thumb[4]
Quick post for a card I did for Hampton Art (and is on their blog) which I like to say is a "happy" hello card. I used lots of bright colors. :) Below is the supply list and instructions. Hope you are having a great Friday. Off to do lots of "chores"...my family likes a clean house and hot meals (go figure). :)

Supplies:
Rubber Stamps -- Hampton Art (SC0469 Flower, IC0160 Border And SC0473 Sentiment)
Inks -- Clearsnap, Inc. (Stephanie Barnard Colorbox in Tangerine and Banana plus Colorbox in Jalapeno)
Embossing Folder – Sizzix
Cardstock -- Diecuts With A View
Jewels -- Me & My Big Ideas (Yellow and Orange) -- Kaiser Craft (Kiwi)
Baker’s Twine -- The Twinery
Instructions:
1. Trim black cardstock for card base.
2. Trim white cardstock. Stamp all images as shown.
use scoring tool to create “blocks.”
3. Emboss white cardstock with small flowers. Trim into three
pieces and mount on black cardstock. Adhere.
4. Wrap and tie baker’s twine at top and bottom.
5. Apply rhinestones.

Monday, February 11, 2013

Hampton Art and Core'dinations Blog Hop

Hampton Art Coredinations Blog Hop One

I am so excited to be a part of the Hampton Art and Core'dinations blog hop. They have a fantastic five days planned! Stampers LOVE good paper and Core’dinations has a wide array of size, texture, and colors in their product line! Take some time to visit each blog today through Friday and see the many projects and effects that you can create through stamping, embossing, and sanding on these great papers with Hampton Art stamps! Make sure you start out each day this week at the Core'dinations blog and end at the Hampton Art blog.

What blog hop would be complete without a giveaway!? Alright, you know how this goes… Like Hampton Art on Facebook (don’t forget KI Memories) , and leave a little comment on the designer’s blog posts each day (comment registration closes Sunday, February 17th)! We will randomly choose one winner of a super fun mystery prize that will be announced.

Hampton Art Coordinations Blog Hop Card

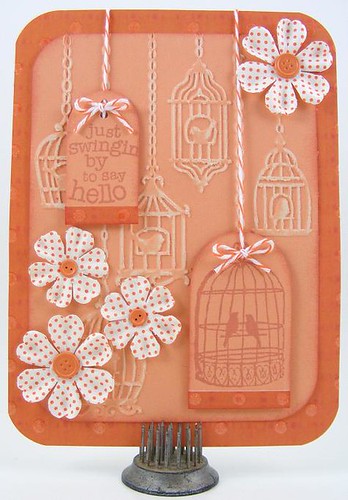
SWINGIN’ HELLO CARD SUPPLY LIST:
Cardstock -- Core'dinations (Color Core/Pastels GX-3000-07)
Stamps -- Hampton Art (PS0320 Bird Cage Love and SC0399 Home Tweet Home)
Ink Pad -- Clearsnap, Inc. (Colorbox Stephanie Barnard in Pumpkin)
Embossing Folder -- Sizzix (#657577)
Diecuts -- Sizzix Framelits (#657568)
Patterned Glitter Cardstock -- Diecuts With A View
Flowers -- Prima Marketing, Inc.
Brads -- The Paper Studio
Baker’s Twine -- The Twinery
Corner Rounder -- Martha Stewart Crafts
Foam Tape -- Scotch/3M

INSTRUCTIONS:
1. Trim patterned glitter polka dot cardstock for card base and round corners.
2. Trim Core'dinations pastel coral cardstock and emboss with bird cage images.
Lightly sand to enhance embossing and round corners. Adhere to center of
base.
3. Stamp birdcage and sentiment images with pumpkin ink pad on Coordinations
coral cardstock. Trim into rounded shapes using Sizzix Framelit dies. Adhere
strip of glittered polka dot cardstock at bottom of both images. Punch holes
at top of each and string baker’s twine. Adhere each with foam tape as shown.
Adhere tiny baker’s twine bows at tops.
4. Secure three polka dot flowers with button brads in lower left corner. Secure
another flower to top right corner.

Don't forget to leave some love at each designer's blog each day for a chance to win some great prizes. :)
Thanks for stopping by. I'm off to finish cleaning and straightening up my craft room. I've only
been doing it for eleven days! :) Yep, it was a mess and I've gone through everything purging, cleaning
and reorganizing. AND famous last words...I'm not going to let it get messy ever again (wink, wink). :)

Wednesday, February 6, 2013

Happy Birthday Card

Hampton Art Fish Card
I have a fun birthday card to share with you which is also on the Hampton Art blog today.
I stamped the fish and balloon images with a Clearsnap Archival Dye (Wicked Black) ink pad and colored them with Copic markers. I framed the fish with a black diecut frame done with my Sizzix eClips. Add some googley eys, baker's twine and rhinestones and you have a fairly fast and easy birthday card. :)

I have not been blogging much lately and I apologize but somehow January forgot the memo to "slow down." :) I'm hoping February will be better but I started it off with a hard job. I decided to purge, clean and reorganize my craft room. What I thought would be a two or three day job has turned into eight days (with another two to go). :) When my craft room gets so messy and piled I can't stand it any longer (which is usually every 2 1/2 years), I get to work on it. It is a job I always dread but when it is done I'm happier and more productive. :) Before I started, I looked at craft rooms trying to get organization ideas. One problem I've had is keeping my ink pads where I could find colors easily. (I have a lot of Clearsnap ink pads!) I read where you could use vintage Napa Valley cassette holders to organize your ink pads. I found a couple on Ebay and one of them came in today. (I got one which has 100 slots and one that has 64 (because of a space issue). I've been using a basket where pads were stacked on top of each other. This meant hunting and searching for a color and it took way too much time. I'm already in love with my new "old" ink pad holder. How did I live without it? :)Another thing I did to save space plus make work easier was to remove my Sizzix eClips design cartridges from their plastic cases. I have all of them in a single plastic organizer (one of those with 21 slots...like you store brads, etc.) I've placed it next to my eClips so no more hunting for a cartridge. It also opened up nearly a whole shelf in one my storage units. :) I did a little shopping this weekend and found some wonderful tapered totes and leather organizers at Lowe's on clearence for 1/2 off. Major score there! :) My work desktop computer moniter bit the dust last week so I decided to take my little flat screen tv in my craft room and turn it into a moniter. I splurged and ordered a 32 inch "smart" TV for the craft room and it came in today too. Don't have it out of the box yet but pretty excited about getting it set up. I left a whole shelf empty just for it! Wink! :) And famous last words....I'm not going to let my craft room get messy again (said the last two times I redid it)....but this time I mean it. :)